In this section, you’ll find instructions for making your own demo scientific machine. In true recipe blog fashion, I’m going to go over the background briefly before we get to the designs themselves.
This demo is designed to allow its user to either present on, or facilitate participants interacting with a model of, machines that are used to physically separate objects based on some characteristic of those objects. But why are scientists so interested in sorting objects based on their differences? Physically separating items simplifies complex mixtures (like you might find inside one of your cells), but can also can give you some characteristic information about each of the objects that went through your machine.

Where’s Waldo (Martin Handford and Candlewick Press) provides great examples of complicated samples.
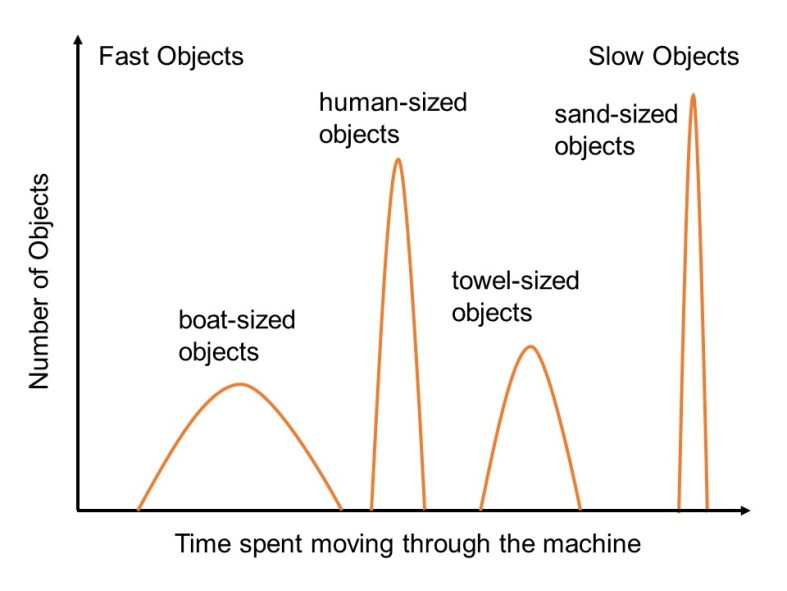
Imagine you are a scientist trying to extract Waldo from the above image. You can design a machine that will separate all the objects in this picture according to one characteristic. You can choose to sort by size, by color, or by surface (which here is any defining feature like glasses, backpack, etc.) but you can only sort by one characteristic per machine. Waldo is human-sized, wears red and white stripes and blue, and has glasses and a backpack. What do you ask your machine to look for? Do you sort by size, so you get Waldo along with everything human-sized? Do you sort by color for red and white stripes, so that you get Waldo but also umbrellas and towels? Or do you sort by surface for glasses, which will get you a smaller group of people but also, depending on how good your machine is, those bug-eyed green fish in the background? There is no correct answer, because there is no perfect, universal separation machine (although people are trying). As the scientist, you have to make a choice.
And there is a further complication. Most separation science machines physically separate objects by selectively speeding up or slowing each object. For example, a class of separation machine, called size exclusion chromatography, separates chemicals of different sizes by forcing the chemicals to pass through a porous material. As the chemicals move through the material, smaller ones are caught more frequently inside pockets in the material, slowing them down enough that they exit the machine after larger objects (they show up after more time has passed). However, in almost all separation experiments the objects being sorted are much smaller than anything that can be seen with the naked eye. If you don’t know how your machine is separating objects, it’s impossible to understand the information it’s giving you.
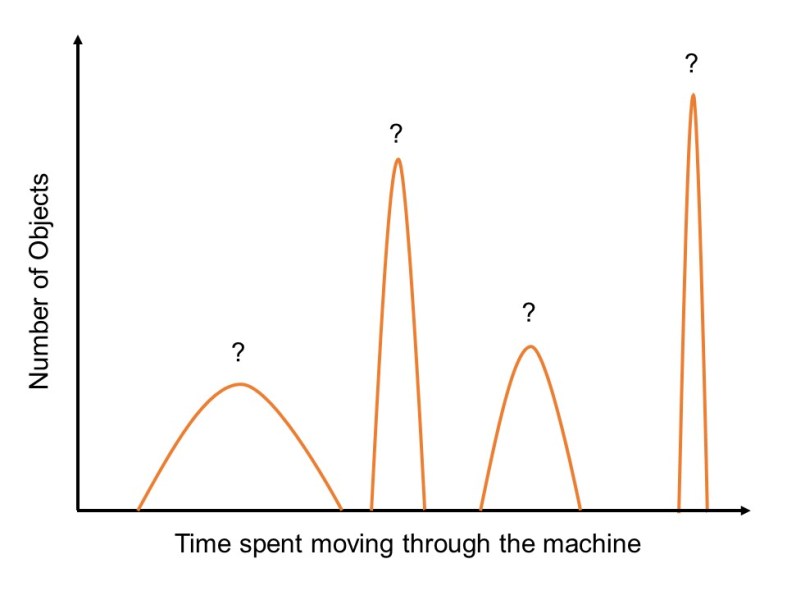
We have this print out, but what does it actually mean?
The end result of these two problems is these machines have to be carefully designed and understood by scientists before we use them to sort any complicated samples. Let’s go back to Waldo, and imagine that we decide to sort that picture by size. We might decide to use size exclusion chromatography, since that should let us determine how many people-sized things there are. If we’re building a size exclusion machine from scratch, we’ll need to start out with a sample that just filled with people-sized objects and something else, like towel-sized objects. This sample is what I would call a standard, and we used it to make sure our machine is working as expected. If the machine isn’t working correctly, we can make changes to it and retest it with our standard.
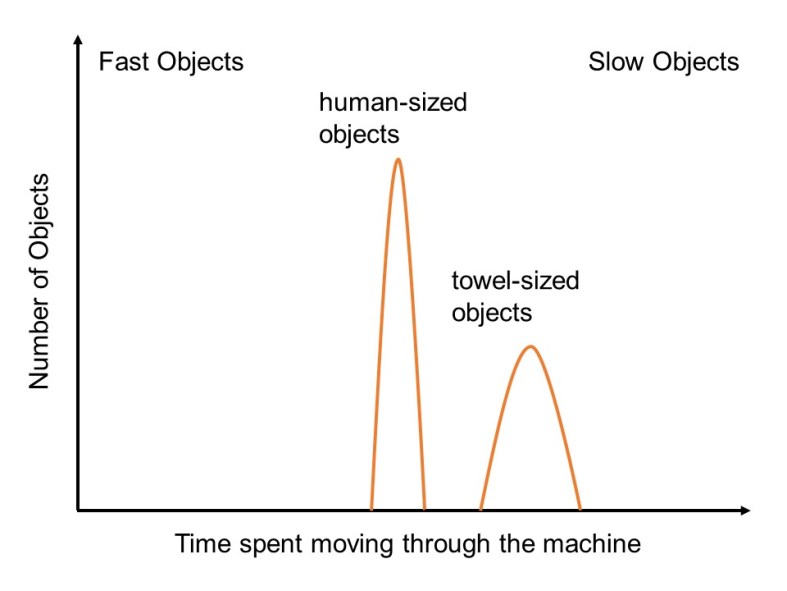
With this information, we now know when to expect Waldo (a human-sized object) to exit the machine.
Once we’re confident our machine can reliably sort towel-sized things from people-sized things, then we might introduce our actual Where’s Waldo sample. Since we know roughly how long it takes people-sized objects to go through our machine, we now know which group in the below picture contains Waldo.
The modifiable machine models this process of building and testing a machine with standards. If you build everything discussed in the designs below, you’ll have three standard samples that contain balls of different shapes, surfaces, or sizes, and modifications to the machine that can sort build a machine capable of sorting each sample. Happy sorting!
This demo was designed to be customized according to your available materials and skill level, and the type(s) of separation science you want to build your activity around. Different pages will go into more detail about these add-ons, but for the basic machine setup, you’ll need:
Material Goods:
To purchase: wood, screws, wood glue, sandpaper, masking tape, and modeling clay (~$60 of material)
Nice but not strictly necessary: a small plastic tub, paint*, Velcro, fabric*, yarn
To access: a pencil, measuring tape, saw,** clamp, drill,** sewing machine* and a crochet hook*
*These materials/tools are not necessary to construction, but colorful or otherwise aesthetically pleasing fabric and paint can make your demo more attractive to your target audience.
** Reminder here to only use these tools if you feel comfortable with them and know how to use them safely. If you’re hesitant, your local makerspace can be a great place to go for help and to access equipment. (Or if you ask nicely at your local hardware store they’ll often help you out.)
Designs:
Basic Machine Design/Assembly: go here for drawings showing the dimensions of all the components that make up the machine, as well the assembly of those components. Detailed instructions coming soon!
Using the Machine: A really basic intro to how the machine can be used to demonstrate how separation science works, with videos.
Optional Modifications for the Machine: Additional sample sets of balls and covers for the machine ramp that you can make to add complexity to your demo.
